
 English
 русский
 Español
 Deutsch

Fleet Maintenance / Brake Systems
Why Auto Slack Adjusters Stop Compensating for Lining Wear
Inside the mechanical failure points that quietly turn a self-correcting brake component into a hidden safety risk — and what a disciplined maintenance rhythm does to prevent it.
The Direct Answer: Internal Wear, Contamination, or Mechanical Seizure Stop the Adjustment Process
An auto slack adjuster stops compensating for lining wear when its internal one-way clutch mechanism, worm gear, or control arm linkage becomes worn, corroded, or physically obstructed. In most fleet inspections, the root cause falls into one of three categories: internal component wear that prevents the clutch from engaging, contamination from grease, rust, or road debris that jams the adjusting mechanism, or a bent or disconnected control arm that removes the stroke signal the unit needs to sense brake lining wear. When any of these conditions occurs, the unit effectively reverts to a fixed, non-adjusting state, and the pushrod stroke will continue to lengthen with every brake application until the lining is replaced or the component fails outright.
Understanding why the unit stops working is only useful if you also know how to recognize the symptoms early, how to adjust slack adjuster components correctly when manual intervention is needed, and how to extend the service interval of a properly functioning unit. The sections below cover each of these areas in detail, with practical diagnostic steps that apply to most air brake systems on trucks, trailers, and buses.
How Self-Adjusting Slack Adjusters Are Supposed to Work
Before diagnosing a failure, it helps to understand the design logic behind self adjusting slack adjusters. Every time the brake is applied, the pushrod moves the slack adjuster arm through a small rotational stroke. Inside the housing, a control arm connects to a strut or bracket mounted on the axle or frame. As lining wear increases, the stroke length naturally grows. Once that stroke exceeds a preset threshold, typically somewhere between a fraction of a degree and a few millimeters of travel depending on the manufacturer, an internal clutch or ratcheting mechanism engages and rotates the worm shaft slightly. This action takes up the extra clearance between the brake shoe or pad and the drum or rotor, effectively resetting the stroke back to its optimal range.
auto slack adjuster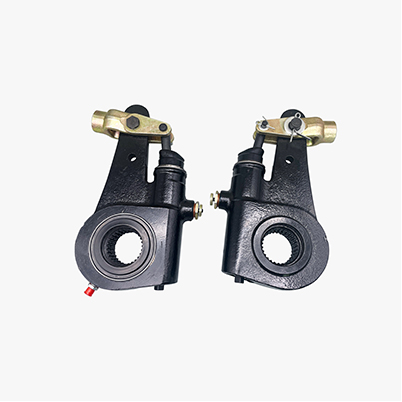
This process happens continuously and automatically, which is why these components are prized over manual slack adjusters that require periodic hand-cranking. However, the entire system depends on a chain of mechanical parts working in sequence: the control arm must move freely, the clutch must engage cleanly, and the worm gear must rotate without resistance. A failure anywhere in that chain interrupts the whole process.
Key Components Involved in the Adjustment Cycle
| Component | Function | Common Failure Mode |
|---|---|---|
| Control Arm | Senses stroke length | Bent, loose, or disconnected bracket |
| Internal Clutch | Engages worm shaft when stroke exceeds threshold | Worn friction surfaces, slippage |
| Worm Gear and Shaft | Rotates to take up clearance | Seizure from corrosion or grease loss |
| Spline Connection | Links adjuster to camshaft | Wear causing lost motion or air leakage |
The Five Most Common Causes of Adjustment Failure
Fleet maintenance data consistently points to a small number of recurring root causes. Identifying which one applies to a specific unit determines whether the fix is a simple cleaning and lubrication job or a full component replacement.
1. Internal Clutch Wear or Slippage
The clutch pack inside the housing is the component most responsible for translating stroke length into rotational adjustment. Over hundreds of thousands of brake applications, the friction surfaces gradually wear down. Once wear reaches a critical point, the clutch slips instead of gripping, meaning the unit senses excess stroke but fails to rotate the worm shaft to correct it. This is by far the leading cause of adjustment failure in units that have exceeded roughly five to seven years of service, even when external inspection shows no visible damage.
2. Corrosion and Grease Contamination Inside the Housing
Water intrusion through worn seals allows rust to form on the worm shaft threads. Combined with hardened, oxidized grease that has not been replenished during scheduled service, this creates enough resistance to prevent the shaft from turning freely. In colder climates where road salt is common, corrosion-related seizure accounts for a disproportionate share of adjustment complaints during winter inspection season.
3. Bent or Disconnected Control Arm
The control arm and its mounting bracket are exposed to road debris, curb strikes, and vibration. If the arm bends even slightly or the bracket bolt backs out, the sensing linkage no longer transmits an accurate stroke signal to the clutch mechanism. In this scenario, the adjuster can appear mechanically sound while still failing to compensate for lining wear, because the trigger signal itself is broken.
4. Worn Camshaft Spline Connection
The spline that connects the slack adjuster to the brake camshaft can develop play over time, particularly on units that have been repeatedly removed and reinstalled. Excess play at this connection absorbs part of the adjustment rotation before it ever reaches the cam, so even a functioning clutch and worm gear produce less effective clearance takeup than the design intends.
5. Incorrect Initial Installation or Setting
Some units are installed with the pushrod stroke already outside the manufacturer's recommended range. If a technician does not verify free stroke immediately after replacing brake shoes or pads, the automatic mechanism may start its service life already near the limit of its adjustment window, giving it little margin before problems appear. Technicians should always confirm how to adjust slack adjuster free play manually during initial installation, even on self-adjusting models, since factory defaults assume correct baseline geometry.
A slack adjuster that appears mechanically intact can still be functionally dead — the failure is almost always inside the housing, not on its surface.
Warning Signs That an Adjuster Has Stopped Compensating
Because the failure is internal, drivers rarely notice a problem until braking performance is already degraded. The following symptoms should prompt an immediate stroke measurement:
- Pushrod stroke exceeding the applicable limit stamped on the chamber or listed in the manufacturer's chart
- A grabby, delayed, or spongy brake pedal feel on one wheel end compared to others
- Visible rust streaks or dried grease buildup around the adjuster housing
- Uneven brake lining wear between axles during a routine inspection
- An arm angle that visibly deviates from the 90-degree relationship to the pushrod at full application
Any one of these findings warrants a full stroke check under a proper brake application, since visual inspection alone often misses early-stage clutch slippage.
Warning
Continuing to operate with stroke length beyond the chamber's rated limit risks the pushrod pulling free during a hard brake application.
How to Manually Reset and Verify Adjustment
Even though the unit is designed to self-correct, technicians still need to know how to adjust slack adjuster clearance by hand for diagnostic purposes and after any brake service. The general procedure is as follows:
- Release the parking brake and chock the wheels to prevent vehicle movement
- Locate the manual adjustment hex or square drive on the adjuster housing
- Rotate the adjustment point until the lining or pad contacts the drum or rotor lightly
- Back off the adjustment by the number of flats or degrees specified by the manufacturer, typically enough to create a light drag-free clearance
- Apply the brakes several times and remeasure pushrod stroke to confirm it falls within specification
Info
If stroke immediately returns to an excessive length after only a few brake applications, this confirms the automatic mechanism itself has failed internally rather than simply being out of adjustment, and replacement is the appropriate next step rather than repeated manual correction.
Preventive Maintenance That Extends Service Life
Most premature failures in self adjusting slack adjusters trace back to skipped lubrication intervals rather than genuine manufacturing defects. A disciplined maintenance schedule meaningfully reduces the frequency of adjustment failures.
| Maintenance Task | Recommended Interval |
|---|---|
| Grease fitting lubrication | Every 25,000 to 30,000 miles or per fleet PM schedule |
| Pushrod stroke measurement | Every routine inspection or DOT service |
| Control arm and bracket check | Every brake reline |
| Spline connection inspection | Every removal and reinstallation |
Using the correct grease specification matters as much as the interval itself. A general-purpose chassis grease that is too stiff in cold weather can restrict shaft rotation just as effectively as no lubrication at all, so following the manufacturer's viscosity recommendation is essential.
Success
A well-lubricated, correctly monitored adjuster routinely delivers several years of trouble-free, self-correcting performance.
When Repair Is Not Enough: Recognizing Replacement Criteria
Not every failed auto slack adjuster can be restored through cleaning and lubrication. Replacement is the correct decision when any of the following apply: the clutch continues to slip after a fresh manual adjustment, the housing shows cracking or significant corrosion pitting, the spline connection has measurable play beyond manufacturer tolerance, or the unit has already exceeded its rated service life as documented in fleet maintenance records.
Danger
Operating with a non-functioning adjuster risks stroke lengths that exceed the chamber's mechanical limit, which can result in the pushrod pulling free during a hard brake application.
In practice, most well-maintained units provide reliable, trouble-free service for several years before internal wear becomes noticeable, but that reliability depends entirely on catching the early warning signs described above rather than waiting for a stroke measurement to fail an inspection outright.


